Saturday, October 22, 2011

Battle of the Devil and the Mud!

You can never go wrong with chocolate cakes! The more chocolate it contains, the more you desire it..

I've been tweaking some old chocolate cake recipes recently and found the one I liked better than my chocolate butter cake. It's texture is so moist and a little springy. Just a little but not as springy as sponge cake. Well, just about there but not there. You know what I mean? And yet, it's full of chocolatey goodness.. What cake comes to mind? The Devil's Food Cake, of course!


It's just yummy. Topped with fudge frosting that has a tinge of sour cream, it's so divine!


And then on to find a denser version of the devilish indulgence - the Chocolate Mud Cake! It is one that is full of chocolate madness in it..


..and topped with the right frosting, it's even more heavenly!


 The type of frosting that goes in and on your cakes depend on not just what suits the cake, but what suits you, too! If you're crazy into chocolate, then thick chocolate ganache would be perfect. Otherwise, a lighter version, the fudge frosting, does wonders, too!


Now, who do you think will win the battle? Let me go indulge myself in that last few bites of my chocolate cake while you drool.. Enjoy!

Thursday, October 13, 2011

Fluffy Omelette

This morning, I woke up with one thought in my head : Eggs!

It's been awhile since I had eggs for breakfast. I used to have eggs regularly.. well, more than regularly, sometimes. I can have it for breakfast, lunch AND dinner! Be it fried or scrambled, with tomato ketchup or chili sauce..

But this morning, my mind was thinking something else. I miss grabbing my breakfast takeaways from BK on my way to work. Specifically, BK's 'Enormous Omelet Sandwich'! Yeah I know.. it's huge and will normally last me for breakfast and my mid-morning snacktime.

It's a great start to the day when you can find all the ingredients you need for what you're going to be making. So what did I dig out? Chicken Ham, Mozarella cheese, Dill, and milk. And voila!


It's very simple and easy. If only I can eat this everyday.. In case you don't have all of the ingredients, just pull out what you do have. There's no hard and fast rules to having your own meal, your way! Enjoy!


Ingredients
2 tbsp butter, for frying
3 eggs
2 1/2 tbsp milk
2 slices chicken ham, cubed
a handful of Mozarella cheese
ground black pepper (optional)
tomato ketchup / chili sauce (optional)


Method
1) Beat the eggs in a bowl. Stir in the milk and dill.
2) Heat a saucepan and roll the butter around in it till the whole surface has been greased.
3) Pour the egg batter into the saucepan and let sit for 2 minutes.
4) With a rubber spatula, tilt the omelette so that the uncooked eggs spreads to the bottom of it. Let sit for 30 seconds.
5) Sprinkle the chicken ham and mozarella on half of the omelette and flip the other half on to it so that it covers the fillings.
6) Let sit for 30 seconds and serve onto your plate. Do not let it sir for too long as this will dry out and brown the omelette.
7) Sprinkle with ground black pepper and ketchup or chili to taste.

It's ready!

I prefer Chili Garlic sauce as it adds a little flavor to it without overwhelming the taste. You don't have to add salt to the egg batter as the chicken ham already has enough to go around. Enjoy!

Thursday, September 29, 2011

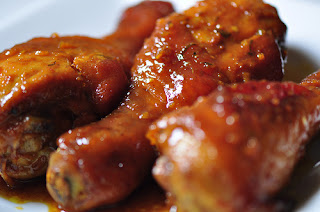
Spicy Honey Glazed Chicken

I've always been looking out for recipes that are simple and fast to make. Well, when you've got a lot on your hands and not much time for preparations, that's always the best way to go.. simple, delish and fast!

The oven is always the equipment I use the most when I'm in the kitchen. For baking, that is! But roasting's a better option then frying, when cooking. Don't you think so?

Well, here's a recipe that I modified from one that I found off the internet. I just love it and will definitely be one that I'd cook regularly. Doesn't it just look delish to you?


Ingredients
8 pieces chicken drumstick / 16 pieces chicken wings
2 tsp finely chopped garlic
1/2 tsp onion powder
1 tsp paprika
3 tsp chili paste
1 tsp salt
1 tsp cumin powder
1 tsp finely chopped coriander
2 tbsp thick soya sauce (ABC)
drizzle of olive oil
1/2 cup honey
1 tbsp vinegar


Method
1) Wash the chicken pieces and pat dry.
2) In a big bowl, mix the garlic, onion powder, paprika, chili paste, salt, cumin powder, coriander, and soya sauce.
3) Marinade the chicken with the mixed spices and let sit for at least 2 hours.
4) Heat the oven to 165 degrees Celcius.
5) Cover a baking tray with aluminium foil and place the marinated chicken pieces on it.
6) Drizzle with olive oil.
7) Bake for about 5 mins.
8) While the chicken is in the oven, heat the honey in the microwave oven for 1 1/2 minutes. Once heated, add the vinegar and mix well.
9) Once the chicken pieces are baked for 5 minutes, glaze them with the honey mixture for another 40 - 45 minutes, turning the pieces every 10 minutes and glaze them every time before turning.

If you're into really spicy food, add another 1 tsp chili paste.If you're not, then omit the chili paste.

Do let me know how yours turned out!

Wednesday, September 21, 2011

Garlic & Herbed Prawn Pasta

Wow.. almost a month have passed since the last post? Time sure goes by in a flash.

With orders and preparation for Eid, and then Eid itself plus more orders, there just wasn't time to experiment much.

But today, I had the opportunity to try my hand at cooking, once again! And of course, it's something simple put together to make a fast and easy dish for lunch.

I love seafood and prawns are my fav! Well, actually, most shellfish are my first choices. So it's a no-brainer that I'd try out something with prawns in them..


Don't they just look appetizing?

Well, I don't have a recipe for it. Everything just goes into and tasted to make sure there's enough of every bit. Here's what I put together to make it easier for you. But please add on according to your taste.


Ingredients
3/4 pkt colored spiral pasta
about 20 prawns, deshelled except the tail
4 cloves garlic
3/4 tsp dried basil leaves
1/2 tsp dried mint leaves
1/4 tsp dried thyme leaves
1 tsp Italian seasoning
salt & pepper to taste
olive oil


Method
1) Boil 3/4 pot of water. Add in 3/4 tsp salt and drizzle some olive oil into the boiling water. Boil the pasta.
2) Drain pasta and put aside.
3) Heat 2 tbsp olive oil in large saucepan.
4) Fry garlic. Do not overfry as it will burn the garlic.
5) Add in the dried herbs and salt & pepper.
5) Stir in prawns. As long as they're pink, they're done. Do not overcook.
6) Stir pasta into saucepan.
7) Turn off the heat and remove saucepan from fire. Serve hot!

Enjoy!

Wednesday, August 24, 2011

Peanut butter cups

Well well.. this is it! The first recipe that I'm sharing with you, my readers. Since Eid is just a few days away, there's still time to make them. It wont cost you much time nor will it cost you much from your pocket.

This recipe is very simple and requires no baking at all. Only refrigeration is needed. Well, what are we waiting for? Here's a sneak of what it'll look like..

 First and foremost, you make the peanut butter filling and set aside to cool.


Place mini liners on a tray. Since the liners are quite flimsy, I made sure they're doubled. When they're done, you can reuse the outer liner for the next batch. Next, melt the chocolate.


Once the chocolate has melted, scoop half a teaspoon of the melted chocolate into each liner.


 Drop 1/4 teaspoonful of the peanut butter filling into the chocolate.


Level it a little if it gets pointy on top.

Next, scoop about another 3/4 teaspoons of chocolate over the filling. Make sure it is fully covered.


Refrigerate for about a half hour and voila, it's ready to be eaten! Simple, right?

If you do try out this recipe, let me know how yours turned out!

-----------------------------------

Recipe: Peanut butter cups

Ingredients -
1 1/4 cups chunky peanut butter (if you're allergic to nuts, use creamy)
56g unsalted butter
50g light brown sugar
150g powdered sugar
700g chopped chocolate

Directions -
1) Combine the peanut butter, butter and brown sugar in a medium saucepan over medium heat. Stir constantly. Once everything has melted and about to start boiling, remove from heat.

2) Add about 1/4 of the the powdered sugar and stir until combined. Do this in 4 batches. Once all has been mixed in, set aside to cool.

3) Once the peanut butter mixture has cooled, melt the chocolate in a double boiler (in my case, I place the chocolate in a metal bowl placed over a medium saucepan filled about 1/4 way with water). Place the saucepan over medium heat and stir the chocolate until almost melted. Remove from heat and keep stirring until all the chocolate has melted.

4) Spoon 1/2 teaspoon of the chocolate into each liner.

5) Spoon 1/4 teaspoon of the filling into the liner of melted chocolate.

6) Scoop another 3/4 teaspoons of melted chocolate over the the filling until completely covered and almost, but not, to the brim. Otherwise, it might spill over.

7) Chill it for about 30 minutes.

These can be kept in room temperature but will become soft. Best is to refrigerate until about an hour before serving. And they're good to go!

For variations, you can also add in crushed or whole hazelnuts into the creamy peanut butter mixture.

I hope you will enjoy making them as I did! :D

Chirpy Chip Cookies

 Yes, you read right! Chirpy, is what you'll be once you've had these chocolate chip cookies. I baked them yesterday and kept on eating them while working last night. I don't really like them too crispy so I lessened the oven time. They're still yummy, no doubt!


I got so excited and wanted to bake them quick that I forgot to even taste the dough. Well, not that I liked doing it but some people told me that they eat cookie dough. So I actually thought of trying it.But I forgot.. :D

And since there was shortage of space on the dining table (dinner was being prepared and table laid out), I had to be on routine. Dough scooped onto trays, the ones baked has to be removed onto cooling racks, and those cooled, bottled. I didn't even have time to count how many I made. But one thing's for sure, I'm baking them again.. Once they're gone, that is.. :D


Wish I had some cold milk to enjoy it with but anyway, they're nice own their own, too! Enjoy!

Saturday, August 20, 2011

The story of the Nutella cake & my secret stash

Oh yes.. who doesn't LOVE Nutella? I'm pretty sure there are those who are not fans of chocolate yet, they still love Nutella. I now the French love them. They have them in bottles of 5kg weights. Should have just bought at least a bottle when I was there 2 years ago.. And I know my customers love them. Especially, a most recent one.

In my previous post, I had some Stitch cupcakes ordered. The cake was chocolate with nutella in it. Yesterday, she collected a cake. It's for the same birthday boy, her fiance, Hanif. She wanted a design to incorporate a bike. Gilera Duke, to be exact. Here's the cake she ordered.


Since she couldn't pick it up herself, she sent a friend on her behalf. But before the cake was collected, she insisted on me sending her a picture of the cake as she was so excited. When done, she was so happy with it and I can feel it from the words in her text.

The main point of the story is, she had ordered a vanilla cake, with nutella and crushed hazelnut spread in the layer, and chocolate ganache covering. Now, doesn't that sound heavenly to you? Coz it does that to me! When she was liaising with me regarding the cake, it just doesn't strike me how heavenly it would turn out. It only happened when I was spreading the nutella and scattering crushed hazelnuts on it. Ahhhh I feel like biting into it! So I requested a picture of the cut cake from my customer and here it is for everyone's enjoyment..


That made me drool even more. And suddenly I remembered my secret stash. Yes! My secret stash. Stuff I bought that made me want to incorporate into a cake but have not had the courage to. The nutella cake made me search for that stash. Here they are..
 

Now, what shall I make to incorporate them in? Hmmm.. any ideas?